Day Out at Rolling Stones Exhibition

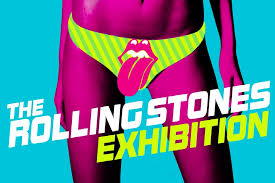
Today I am taking a diversion from interiors to tell you about my day out in London yesterday at the Rolling Stones exhibition at the Saatchi gallery.  I felt this was an exhibition that I had to get tickets for, as I was disappointed when I missed out on the David Bowie exhibition a few years ago.

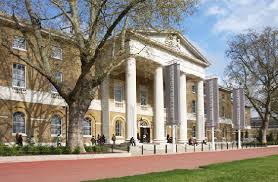
The Saatchi gallery I think is a beautiful building in a lovely setting near Sloane Square and is Grade II listed and was originally built in 1801 as the Military Asylum for children of soldiers of the regular army.  Around 2005 the plan was for it to be turned into offices, but the Saatchi gallery was on the lookout for new premises and after 2/3 years of redesign to make the interior suitable for gallery use, the Saatchi gallery re-opened in October 2008. I love the mellowness of the yellow bricks, the strong columns and portico to the front.  Internally as a contrast, all is white and minimal – a perfect backdrop for showing off all the art to full effect.

saatchi


exhibitionism
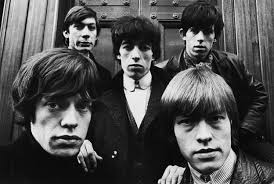
I can’t pretend that this is an in-depth look at the exhibition by any means, but merely just an overview and my opinion.  As the exhibition started only a couple of weeks ago there were long queues to get in as it was a Saturday after all, but once we entered we were propelled into the world according to the Rolling Stones.  The exhibition is broken up into 9 zones – immediately you become immersed in a multi-screen visual and auditory feast – the first zone gives you a taste of how their popularity rose by way of records and albums sold through the decades to how they began gigging across the UK in the early days before gathering pace to sold out world-wide tours.

The next zone gives an insight into how the band members lived together in the early years with an actual mock-up of the flat they all shared – with ripped wallpaper and curtains – they were more concerned with perfecting their craft rather than washing the dishes.

rolling stones 3

The exhibition follows through to memorabilia from their early days of touring – concert posters, tickets and photographs.  From here you follow through to view numerous guitars and a mock recording studio – all the time with snippets of music in the background and voice recordings.  Upstairs the rooms contain art and design work for their album covers, song lyrics, videos and films made, stage sets, fashion and costume, collaborations and finally in the back stage area we were all given 3-D glasses as we went through to watch the finale with an interactive performance.

I find I do not want to describe in too much detail as I do not want to give too much away for anyone wishing to go but suffice to say I thought this was a fantastic exhibition – although costing more than the average exhibition I have been to, I feel the price was justified as it was on a much bigger scale and with the large multi-screens it took the experience to a different level.  It concentrates on the band itself and their rise to fame; how they crafted their songs and live shows, rather than the lives of the individuals and the sensational media headlines.  It was well thought out, comprehensive, all the important aspects of the group’s history had been shown.  I think I just love absorbing popular culture from the 1960s onwards – as I was born in the sixties, but as a child growing up was really unaware at that time of the cultural shift that was taking place.

Over the decades the Rolling Stones have given us all some of the greatest songs and it has got me thinking about my favourites.  I find it impossible to choose just one but my top 5 goes like this: ‘You can’t always get what you want’, ‘Gimme shelter’, ‘wild horses’, ‘fool to cry’ and ‘miss you’.   Unfortunately I have never seen them in concert but after watching their Glastonbury 2013 performance on TV it is definitely on my ‘to do’ list!

Finally, if like me you are  a huge music fan I would recommend this exhibition – the sights and sounds evoke so many memories of a group that is embedded into our popular culture

tongue


Images via Google images


ICONIC CHAIRS

This week I have been thinking about my favourite piece of furniture – an item we use multiple times a day – yes, the humble chair.  I love that there are so many different varieties; different textures, colours and purpose – for dining, for lounging, for working etc.

However there are a sub-section of chairs that stand out from the rest that have become icons in the market – these are more often than not mid-last century design led – and some of my favourite ones I will share below:-


Charles-Eames-Style-Lounge-Replica-Chair-and-Ottoman,-Black-Powder-Coating-SwivelUK.com-20

Eames Lounge Chair & Ottoman

I think that this must be the most coveted of all chairs.  Designed by husband and wife team Charles and Ray Eames, it was their aim to produce furniture that could be mass produced and affordable (more on that later), with the exception of the lounge chair which was designed for the high end market.  The chair consists of three curved plywood shells; the headrest, the backrest and the seat.  Originally the shells consisted of five thin layers of plywood covered by a veneer of Brazilian rosewood.  However this practice was discontinued in the early 1990s and currently production consists of seven layers of plywood covered by finishing veneers of cherry, walnut, and Palisander rosewood (similar grain patterns to the original Brazilian but sustainably grown), and other finishes.  The layers are glued together and shaped under heat and pressure.  The seat cushions are sewn with a zipper around the edge.  The chair first came into production in 1956 – and is still in production today via Herman Miller and Vitra, although other companies produce direct copies.  This is definitely on my wishlist!


IMG_0259

Barcelona chair

I love the Barcelona chair – this is my one – although not an original one, mind!  This chair was designed by Ludwig Mies van de Rohe (one of the first modernist architects who drove the German Bauhaus Design School in-between the war years).  He designed the chair with his partner Lilly Reich, although she doesn’t seem to get much of a mention these days.  Originally the frame was designed to be bolted together, but in 1950 with the development of stainless steel the chair was re-designed with a seamless metal frame.  The only other change to the design is that cowhide now replaces the expensive pigskin which was used in the original design.  The chair has now been in production for almost 90 years – having first been shown in 1929.  The chair was honored with the Museum of Modern Art Award in 1977 and it just a perfect piece of furniture – modern and timeless.


Egg Chair Red

Egg Chair

The egg chair was designed by Danish designer Arne Jacobsen in 1958 and was originally meant to replace the couch or sofa.  They were much in demand due to their unusual aesthetically pleasing looks and comfort, however most of the chairs created were for the Radisson Hotel and were highly expensive.  The originals were covered in two cowhides sown together.  In 2008 Fritz Hansen, the producers of the original chair produced 999 limited edition egg chairs to commemorate 50 years of production.  These were produced in leather and suede and every one has an exclusive number engraved on the seat of the chair.  These days imitations of the egg chair are widely available in a variety of finishes and fabrics.


Hans-Wegner-Style-Wishbone-Replica-Chair-SwivelUK.com-335

Wishbone Chair

The wishbone chair is the epitome of the classic dining chair designed by Danish designer Hans J. Wegner.  It is a very simple design but handmade with fine craftsmanship.  The hand weaving of the seat is one of the final processes of the chair’s construction, which is incredibly strong and is reported to have a life cycle of approximately 50 years.  This chair first came into production in 1950.


original_eames-style-dsw-chair

DSW Eames Chair

Back to the infamous Charles & Ray Eames who described their ethos as ‘getting the most of the best to the greatest number of people for the least’ – and so this fiberglass chair first appeared on the market in 1950.  The chair was designed for the ‘International Competition for Low-Cost Furniture Design’ which was staged by the urgent need in the post war period for low-cost housing and furniture designs.  The chair came in a variety of colours and bases with there also being armchair and rocker designs.  Initially there was a long period of product development which involved shaping the fiberglass material with metal molds using a hydraulic press.  The armchair was the first one-piece plastic chair whose surface was left uncovered and not upholstered.   The chairs are still in production today by Herman Miller, Modernica and Vitra with each using a different material for their chair.  Vitra discontinued production of the fibreglass shells in 1993 and now uses polypropylene which is a more environmentally friendly material.  This is the chair I am hankering after for my new kitchen update!


Azure-30-Chairs-Ghost-Kartell

Louis XV Ghost Chair

This chair is relatively new, being designed in 2002 by Philippe Starck who was more renowned as a luxury hotel designer.  He collaborated with the Company Kartell during the 80s and 90s with a view to adding his flair to their ethos of developing eco-friendly, contemporary plastic furniture.  Indeed the chair has been developed with the use of polycarbonate recyclable plastic.  With influences taken from the classic Louis XV armchair,  the result is a post-modern fusion of innovation and historic style.  I admit I do own one of these chairs which sits in my office/study and has become a modern classic; in fact I have read that it is the most popular ‘original design’ in history.


Well that is the end of my brief look at a selection of iconic chairs but there are endless other georgeous chairs on the market, so please feast your eyes on the ones below:)


Information sourced from Wikipedia and images from Google images

EN-SUITE HEAVEN!

This week I am writing about something very exciting which all came together earlier this year. Finally, we have our new en-suite shower room completed, after waiting well over 12 years!

Yes, when we originally had an extension to our house around 18 years ago we had built an en-suite which at that time was a luxury, and still is. We had a fully tiled space with a reasonably sized shower, standing basin and toilet. However, before too long the new shower started leaking down into our garage and after some investigation there was nothing for it but to rip the shower out…… and this is the way that it stayed for the next 12 years or so. We could still use the toilet and sink but it was always in our plans to update it, however somehow something else always seemed to take priority and our new shower always got shunted to the bottom of the pile.

Unfortunately I don’t have any photographs from those days but needless to say it was full of 90’s style tiles – dark apricot colour with the occasional flower motif and vinyl flooring. So during last year we decided to make this long forgotten room a priority and put it to the top of our list.

During the intervening years our neighbours had built an extension which annoyingly had blocked out a great deal of light coming through the small window and the room seemed quite dark, so the first thing we did was to have installed a Velux sun tunnel. This is an ingenious idea where a hole is cut into the roof and a reflective tube is fitted that sits into the ceiling bringing in lots of light, as you can see below:

IMG_1325

The revamped en-suite had been in the pipeline for so long that I knew in my mind exactly what I wanted and during last summer I began researching products and companies who could pull the look together. I finally settled with a local company and was introduced to Greg and who I immediately felt at ease with and our initial appointment with him lasted around 2 and a half hours, with us being the last people to leave the shop!  He look the room’s measurements and tried various designs on his computer.  I had explained that my vision for the room was a wet-room – as we had had previous leaking into the garage we wanted the whole area sealed to prevent a repeat of this, and I imagined a spa-like finish which included a wall hung toilet and basin, a glass partition with walk in shower area and also key to my design was a seated area within the shower itself.  Greg played around with various options but was unsure how the sink design would fix to the glass partition.  He then came up with the idea of building a three quarter height wall and building the seat to fix in-between the walls.  I loved this idea!  From then on the ideas flowed – a small wall would be built out from the back to house the workings for the toilet and sink – we were to have a drawer unit with white worktop which has a bit of a sparkle to it – and on top of this we chose a round basin with taps hung from the wall.  This look was so different to anything I had lived with before and I could feel my dream coming together.  Greg had the expert knowledge to put it all together and worked out that we could have a shower head which hangs from the ceiling – this is digital  and flashes until the correct temperature is reached (fancy:)!)- we also wanted a second small hand held shower to compliment the showering experience.

IMG_1232

As just seen here, ceiling shower together with handheld

Once we had the design settled we had to impatiently wait for a start date for the work to commence – and one last job to chose the tiles.  Greg had lent us a sample tile upon our initial visit and no matter how many I looked at, nothing beat that initial tile – and of course they were expensive Italian Porcelanosa tiles – but, hey I have expensive taste!  We have large oblong tiles for the wall and square for the floor providing a touch of contrast.

IMG_1237

Greg’s recommended builders did a grand job – although it came with the usual big clean up once they had finished – and it took nearly a couple of weeks to fit.  Here are a few pics of the finished room:


We are so pleased with the result – it makes all those years of waiting worthwhile – and I feel we have the best design (we had a previous design drawn up some years ago, but it wasn’t a patch on what we have now).  Showering is now a treat – and the best thing – sitting down on the bench to shave my legs!   Of course I am still looking for the perfect accessories to complete the look, but nothing too much; my aim is to keep it minimal.  Hope you like:

Finally, a couple of weeks after our room was complete the showroom sent out their resident photographer who worked her magic and featured us in their blog which please read through here Lifestyle Blog

Please check this out as the photographs are much more detailed than mine and there is also a lowdown on the products used


KITCHEN IN PROGRESS

Hi there, and welcome

Following my opening post which I hope gave you an insight into all things important to me (well aside from family and friends which goes without saying of course!) , I thought I would continue with my latest project.

As mentioned in my first post, having completed the interior design institute on-line diploma towards the end of last year – mostly because I find the subject endlessly fascinating but also to prove to myself that indeed I could apply myself to distant learning and follow the course through to the end and gain the certificate!  The course became like an old friend over the couple of years it took me to complete and I learnt such a lot that once I had finished it, and after a break for Christmas, I went on to sign up for one of their advanced modules in Home Staging.  Home Staging is mostly used by stylists and interior designers when dressing a property for sale – to make the property  appeal to a wide range of purchasers who can envisage the house suiting their lifestyles.

For my assignment I have to choose a room to update and dress for sale.  I have decided for this to be our kitchen as I feel this is a weak point in our house.  I make no secret of the fact that in the future I would love to move to somewhere a little further in the country to look out on green fields – it may be pipe dreams but if we were to put our house up for sale then the kitchen would be the room to dress.  Now, before I go any further I must add that this is an interim step as again, in my dreams, what I would really like to do is to knock through into the dining room – take down an old conservatory we have at the back of the house – add a small extension in line with another we have to the side of the house – and have a large open plan kitchen/diner with bi-fold doors onto the garden.  However, as we have not won the lottery nor the premium bonds – the steps I am making are the next best thing.  Please check out my Pinterest page for my dream kitchen looks My dream kitchen board

So, here are a few pictures of my kitchen prior to my update.  Basically it is a perfectly good kitchen but unfortunately stuck in the nineties with all that varnished pine that is not so fashionable these days, and quite dark.

My initial thoughts were to buy some furniture paint which says on the tin no need for sanding down – just paint straight onto the doors.  In my naivety I hoped this were true but unfortunately this has turned into a much larger and more expensive project than I had hoped!  Hubby jumped into the rescue and basically dismantled the unit doors and trims – and hung them as an art installation in the garage!

IMG_1297

Here they have been sanded, wiped down and painted with 3 coats of undercoat before 2 coats of the furniture paint – what a job!  I was hoping to get the work done over the Easter break as I had a few extra days off but I have now had to return to work and hubby has been a hero finishing things off for me.  He has finished the standing units in the kitchen and hopefully will be moving onto the doors next week.  We have decided to repaint all the kitchen walls as well as purchasing new door and drawer knobs as the original ones were worn out after 18 years of use!  We are also replacing the worn out kickboards with some nice new chrome legs opting for the more open look that is popular today.  Here is a photo of progress to date, I am so pleased with my lighter, brighter units

IMG_1298

Lovely new off-white units

I have been gathering thoughts in my mind as to the finished look of the kitchen and have made a sample board through Olioboard as below:

OB-My kitchen April 2016

Unfortunately I could not find the exact items I had in mind but it gives you an idea of some of the accessories I will be looking to source to give the room a more relaxed lived-in vibe to bring in the idea of living/eating in the room that appeals to people these days.  The idea of home staging is that you de-personalise your rooms, so that when prospective buyers come to view they can imagine themselves living in the space.  So to take my photographs for my assignment I will take out the few photo frames that I normally have on display but shall return them afterwards to make the space special to our family.  I wish I could replace the kitchen floor tiles as I am so over them but when I looked into painting them I decided that they could get easily chipped and likewise with placing some vinyl over the top I read that through use the lines of the tiles show through so I have decided to purchase a complimentary flat weave rug to lay down and cosy things up a bit.

Well we have a lot of work to do and I also have to wait until next pay day to purchase all the accessories!  However I am hoping that we will finish the room by the end of the month as I am hoping to start on the next room during May! Yes, I have plans for my house this year – putting all that I have learnt into action!  So I will come back to my kitchen in a few weeks to show you the finished result, just hoping that it is enough to pass my assignment!